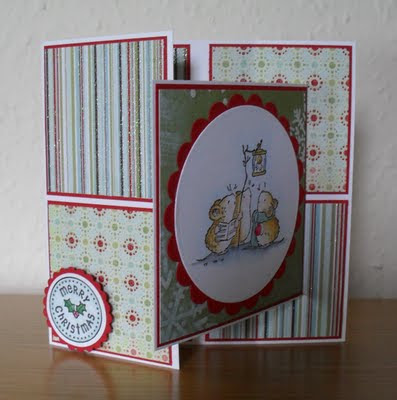
'J is for Joy Fold Card'
Our sponsor for this challenge is:
The prize is a $15 voucher to spend in the Simon Says Stamp store.
To help you with this challenge, I have prepared a tutorial on how I made my card.
So, what exactly is a 'Joy Fold' card???
Basically, as you can hopefully see from my card above, it's a card that has two interlocking flaps...one smaller than the other...that opens to reveal a hidden message or image.
I'm going to show you below how I made my card. I'm by no means an expert at this type of card...though I have made a couple before...and this is not the only way to do it, but it gives you the basic principles.
To start with, cut your card blank in whatever shape & size you like - mine measures 5.75 inches square - then cut the front flap in half:
Then, cut the smaller flap - again this can be whatever shape & size you like - mine is 4x8 inches, then folded in half:
The photo below shows how the two pieces will fit together...notice how they open in opposite directions:
The smaller one will be stuck underneath the shorter flap on the main card, so that they overlap:
Now for the fun part...decorate the pieces however you like - here's the main card:
And the smaller flap:
Remember...it needs to open the 'wrong' way:
Then, stick the pieces together:
All that's left to now, is to add something to hold the front flap closed...I've added a sentiment cut out with Nesties...you only want it to overlap by a small amount - you still need to be able to open it!:
To make it easy to open (and close again), I mounted it on to thick foam pads:
Here's the finished card:
And open:
I hope you found this helpful...we're all looking forward to seeing you try this card fold!
Materials used on my card:
Image Stamps - Penny Black 'Christmas Critters' & 'Holly-Jolly' sets (coloured using watercolour pencils)
Papers - My Mind's Eye 'Wonderful Winter'
Nestabilities - Scalloped & Classic Circles dies
Sentiment Stamp - Cuddly Buddly
I'm also entering this card into the following challenges:
- Crafty Hazelnut's Christmas - Photo Inspiration (I've used the Red & Green colours)
- Lollipop Crafts - More than One Fold
- My Time to Craft - Scallops
- Papertake Weekly - Punches & Dies (I've used several different Nesties)
- Sunday Sketch & Stamp - Sketch
- Winter Wonderland - Colours of Christmas (I've gone traditional with Red & Green)
For more inspiration my my lovely DT buddies, and our three fabulous Guest Designers, please visit the ABC Christmas Challenge.


Beautiful card! Thanks for the tutorial!!
ReplyDeleteGreetings, Saskia :)
Super tutorial Helen, and a smashing meece card! Sxx
ReplyDeletewow thats gorgeous!
ReplyDeleteSuper duper tutorial Helen. Easy to follw and some great pictures.
ReplyDeleteYour card went out really pretty as well. Lovely coloures and a cute image.
hugs Dorte
GORGEOUS card and I'll definitely have to try this new folded card. Thanks for sharing. Dawn♥
ReplyDeleteSo gorgeous card Helen.
ReplyDeleteHugs Riet.xx
Fantastic card (I'm going to do one for the ABC challenge) - thanks for joining in my CHNC challenge 19 - hope to see you again soon. x
ReplyDeleteGorgeous card Helen and fabulous tutorial !! very well done :-)
ReplyDeleteI love the image you used and the papers and design are fab :-)
luv
Lols x x x
what a cutie christmas card. great tutorial too. Thanks for joining us at papertake weekly xx
ReplyDeleteGorgeous card, Helen! I love the layout and papers, and your images are lovely! And your tutorial is fantastic! Very clear and easy to follow:-)! Well done on everything! Hugs Delphine xx
ReplyDeleteHelen, this is fantastic!! Your tutorial is so clear and easy to follow! And I love the sweet images you used on your card!! Thanks for the tutorial!
ReplyDelete~Lacey
Fabulous card Helen and love the way you have incorporated my sketch into the J fold. Thanks for playing along this week with SS&S. Hugs, Claire x
ReplyDeleteOK - my next card is a joyfold card - in fact, tonight and it's gonna be a xmas card! Thanks for playing and keeping us thinking - the Christmas season will be here before we know it!
ReplyDeleteJuelmarie DT - Lollipop Crafts
Helen, Fabulous tutorial! I love how you have the inner and outer image matching. So cute!
ReplyDeleteWow.... great card ! and thanks for share with us this perfect tuto!
ReplyDeleteThanks for commenting in my blog !
~Maria Elena~
http://mariaelenaworld.blogspot.com/
Gorgeous Christmas colours
ReplyDeleteThanks for joining us on WINTER WONDERLAND :)
Hugs Jane x
Lovely card, super image. Layout and papers. Thanks for joining in our challenge at MTTC this week.
ReplyDeletePat xx
Oh those mice are sooo cute! Lovely card!
ReplyDeleteThanks for playing with Sunday Sketch & Stamp!
Sparkly Moo x
Helen this is fabulous! the card is just Perfect and your tutorial clean and easy to follow! Hugs Samantha :0)
ReplyDeleteHelen, this is gorgeous. Love the way your image works with the gorgeous papers.
ReplyDeleteFantastic job with the tutorial.
Hugs,
Carissa
This is gorgeous. Adore the beautifully coloured images and the dp used.
ReplyDeleteJayne xx
Lovely folded card and cute images! Thanks for taking part in the MTTC challenge xx
ReplyDeleteGreat card! Thanks for the tutorial too!
ReplyDelete